How to get started
This guide will walk you through how to get started setting up the basics within your account.
(( “HOW TO SET UP YOUR PAPERTURN ACCOUNT” VIDEO HERE"))
Quick jumps:
Step 1: Upload Your PDF File
To create your flipbook, log in to your account and click “New” on the Main Sidebar. Drag and drop a PDF file or use the file finder to upload your PDF file to Paperturn.

Once the conversion is complete, you'll see a thumbnail of your flipbook cover on your screen. Click on the "View live" icon to explore your flipbook and see it in action, mirroring the experience your viewers will have. You can learn how to customize your flipbook by reading our guide here.

Step 2: Set Up Your Flipbook Account
Customize Your Account's Settings
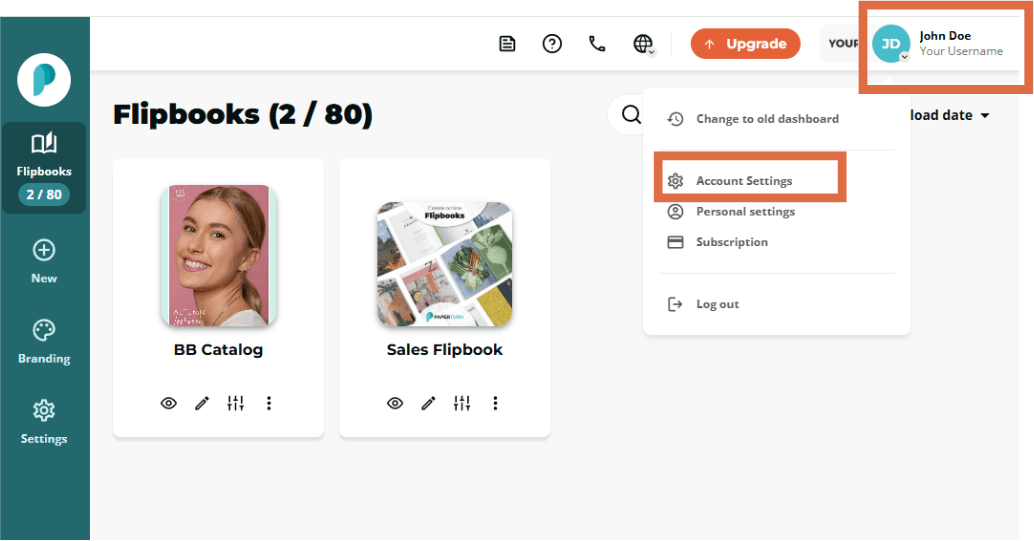
In the top right-hand corner of the screen, click on the “Profile Dropdown Menu” and select "Account Settings".
In the "Account Settings" section, you can do the following:
- Edit your account name
- Disable or enable Paperturn's branding
- See your account type, creation date, and data residency
- Edit the global SEO values for all new flipbooks
- Add GA4 and GTM tracking globally to all your flipbooks

Add Team Members to Your Account
With our PRO subscription, you can add up to 10 users to your Paperturn account. From the Horizontal Navigation, click on the "Team" tab and follow our detailed guide on using the Teams feature to get started.

Customize Your Personal Settings
At the top right-hand corner of the screen, click on the “Profile Dropdown Menu” and select "Personal Settings".

Here, you can edit your personal information (name, phone number, email), enable two-factor authentication (2FA) on your account, choose your timezone / date format, and change your password.

Customize Your Account's Branding
In the Main Sidebar, click on the "Branding" icon.
When saving the global design settings, you are setting a default design for all new flipbooks you upload to your account. This means that every new flipbook you create will use these design settings, unless you customize the individual flipbook's design.
In the global design settings, you can edit your flipbooks' colours, select whether you want shadows on the pages; a flip sound; background music; hardcover; right to left orientation (relevant for languages such as Hebrew and Arabic); and the option to select your preferred flipbook display (e.g. single page / double page display).

Add Your Company Logo and Browser Icon to Your Account
In the Main Sidebar, click on the "Branding" icon. Choose the "Global Logo and Icon" tab from the Horizontal Navigation.

Your Global Account Logo will be shown when your readers open your flipbook in the flipbook viewer. It will also appear on your account (in the top right-hand corner) and on any publications without an individual logo. To add an individual logo to an individual flipbook, you can follow our guide here.
Your Global Account Icon will be shown in the browser tab when your viewers open your flipbook.
STEP 3: Add Your Billing Information
In the top right-hand corner of the screen, click on your Profile Dropdown Menu and select "Subscription".

In the main “Subscription” tab, you can see your current subscription and payment method. You can edit your subscription by clicking the red “Upgrade” button, or change your payment information by clicking “Update payment method”.

In the “Billing information” tab, you can enter your billing address, add a billing email, enter a PO number (which will appear on your invoice/s), and add a VAT number.

That covers the basics of getting your Paperturn account up and running!
To supercharge your flipbook with interactive features, follow our other great help guides on how to add links, videos, advertising banners, music, and more!
